Showing posts with label safety. Show all posts

Friday, January 11, 2013

Guns by a Gun Guy

Okay, I have been wrestling with my initial promise to myself not to blog politically here. I believe that we all have much in common by virtue of our humanity, and that politics, and political discourse, makes us maintain inflexible walls. I believe that people all over the political spectrum can share views and advice about very meaningful stuff, homesteading, living a loving and respectful life, making do with little, being creative, loving life, beauty, song, stories, and one another. With that in mind, I really really do intend to leave political discussion to other people. I want to write here about non-divisive aspects of living in a positive way.


But recently, in the wake of the school shootings at Sandy Hook, it seems that everybody is talking about guns. That's not political in the sense that arguing about teabaggers/libertarians/Maddowites/Foxdrones/Feminazis, etc., is political. America's gun culture is unique in the world. So many factors in our history have brought us here, from the oddly phrased second amendment to the cowboy culture of the Victorian Age in our western states and the hunting and trapping that was so significant to the development of our groundbreaking ancestors, just the grandparents and even parents of many of us. When people say that guns are inseparable from American culture, they are right. 

Before you change the channel on me, let me set out my credentials on the issue. I grew up in a gun home. My father was a riflery coach in the local high school when I was young. I learned to shoot at about age five. I have been duck-hunting, partridge hunting, rabbit hunting, deer hunting, skeet-shooting, oh hell, shooting anything I could call a target for as long as I can remember. I own four guns, and am honestly considering another. All four of those guns are quickly accessible to me, and loaded, when I am home. I have a valid concealed carry permit in two states. 

Here's the kicker. I revere life, love, and peace. Unlike many of my fellow gun owners, my reaction to the Sandy Hook killings was not, "Oh boy, now Obama is gonna take my guns, I knew this was coming," but rather, "Oh, those poor families. What has gone so wrong with humanity that anyone at all could ever actually shoot one defenseless child after another? And what can do to prevent this from happening again?"

I have a great deal of respect for the frontier culture, the hunting culture, the history of successful rebellion, that have brought us to where we are. I hold much of that close to my heart. But listen. We don't have unpoliced frontiers any more. We are not rebelling against the king any longer. Almost anywhere in the country, if you have a shotgun with two rounds in it, or a small handgun, and a triggerlock, in your bedroom, you are adequately prepared for just about any possible criminal incursion. And I don't understand why anyone who hunts in American needs a gun that shoots more than a handful of rounds at once. I don't understand why anyone who leads a normal life in ANY city in America needs a handgun that shoots more than five or six rounds. We don't live in the movies. We live among humans. Nobody, and I mean nobody, in our country, has a need that I will accept, to be able to fire more than a half-dozen rounds in a minute. If no weapon that could exceed that were legal, we'd have fewer gun-related deaths. Simple as that.

The argument that there are just too many guns out there, that regulating them wouldn't keep them from the hands of those who might do harm, is just baloney. I remember when it seemed ridiculous to stop drunk drivers, because it was so much a part of our culture, or to prevent people from smoking in restaurants for the same reason. Looking back, I'm glad that legislation was passed to move both of those issues in the right direction. We can do the same thing with guns. Here are some possibilities. 1. We make ownership of high-capacity magazines, and automatic-fire weapons illegal. Yup. Don't need them to hunt, don't need them to protect your home, don't need them at all. You want to have that kind of killing power? Join the army. 2. Require liability insurance for gun ownership, with rebates for safety procedures, same as we do for moving motor vehicles. Tell me why not. I'll insure mine, no problem. 3. Require training, certification, and registration of all gun ownership. Tell me why not. We already do it with cars, and they actually provide a non-violent service on a daily basis. 4. Charge anyone whose gun is used in a crime with negligent manslaughter or whatever else is appropriate. If you have a gun, and someone else can readily find it and shoot it, you are irresponsible with a deadly weapon. Tell me why not.

I'll get back to how-to, building, crafts, creative writing, etc, now that I have this off my chest, I promise. Thanks for listening. 


Thursday, September 20, 2012

How to Clean a Chimney

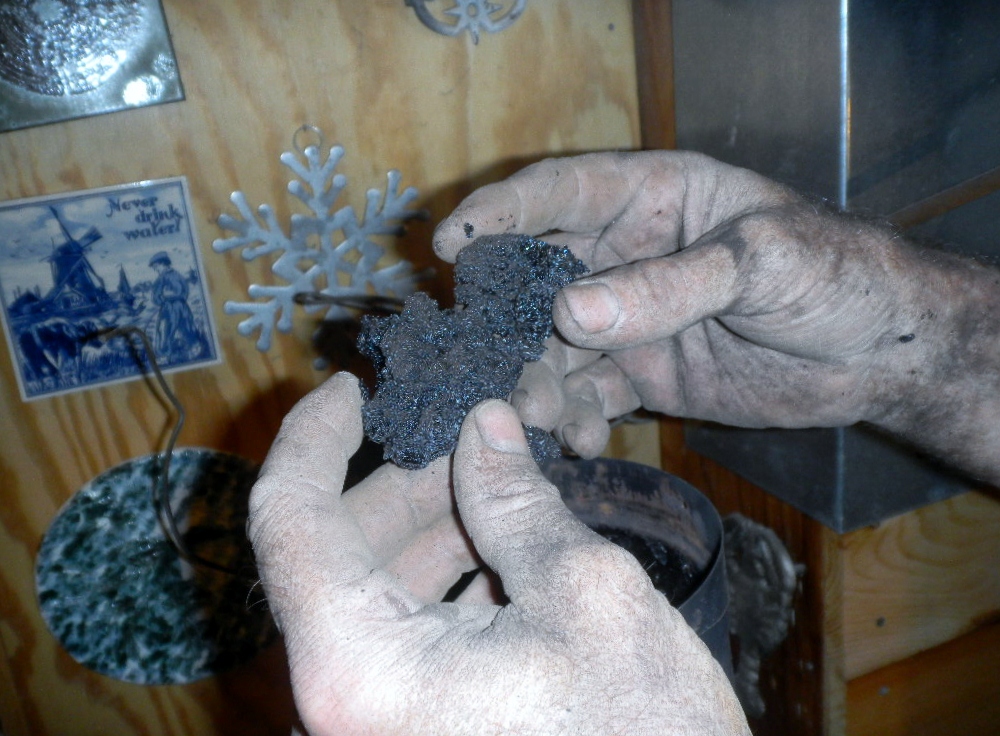
This is creosote build-up (photo by Honey)
I skipped my annual chimney-cleaning last year, partly from laziness, and partly from faint rationalization. If you have some idea that it's easy, just because it's called "sweeping," think again. Some chimneys may be easier than others, but mine requires numerous repetitions of crawling into the basement, pulling really hard on a rope and breathing ash and creosote dust, then climbing out and up to the roof to pull really hard on a rope while trying not to fall off the chimney. It has become what I think of as the hardest scheduled task of the year, since putting the firewood by is spread out over so many days.

Soren reaches deep...(photo by Honey)
 The rationalization comes from my having talked myself into thinking the chimney was clean enough. It wasn't, and I began to suspect as much this past spring, when the stove started to smoke after no provocation at all. I mistakenly believed that the galvanized-steel trick (more on that below) let me off the hook for cleaning.

It would be easy to write this post as an extended metaphor (for keeping your house in order, for not letting the debris of the past clog your present endeavors, for taking on big challenges with support rather than alone, possibilities abound), but I'm going to try and simply describe the process while celebrating this first time of having two fine young men to help. This will free you to read into it whatever metaphors or lessons you like; I only know that it was a rewarding day on several levels, the clearest of which is that we can use the wood-stove again!

(photo by Honey)
First, the thing about galvanized steel. I've heard from some old-timers that if you burn scrap galvanized steel in your fire occasionally, something about the zinc coating affects the polarity of the ions or some such thing that's beyond my schooling, and what happens is that the inevitable creosote buildup flakes off and falls down to your clean-out door at the base of the chimney. I think this works in a way similar to those chimney-cleaning powder tubes that you can buy at hardware stores. Based on the amount of granular ash in my clean-out, I believe it works up to a point. Unfortunately, it didn't work well enough for me to justify skipping a year's cleaning. The whole reason for this exercise, by the way, is that when a woodstove doesn't burn completely efficiently, and none of them do, unburned gases from the smoke condense on the inside of the flue, gradually creating a flammable, sticky deposit of creosote, like heavy tar. This is the fuel for chimney fires, and should be cleaned out regularly.
Here's the process. first, find the clean-out door at the base of your chimney, and shovel out all of the ash that has fallen to the bottom over the past year. That part's pretty easy. This year I found almost ten gallons of ash, which meant that it was stacked high up into the chimney, and I had to loosen it with a long flexible stick. Next, carefully remove the stovepipe from your woodstove to your chimney, take it outside, bang the creosote out of it, and put it back in place. If you don't put it back before moving on, you'll get a houseful of ash!
An ancient skill passes to another generation

Next, assemble your tools. I use a wire chimney brush, basically a bottle-brush made of spring steel that fits my 8-by-8 inch flue, pushed down by several threaded fiberglass rods that connect in a row. They are too springy to push the brush all the way, so I have to also pull it through from below, like flossing. To do this, I tie a weight (splitting wedge) to a sturdy rope, with the other end attached to the base of the brush. Drop the weight down the flue, start the brush down after it, and then go down cellar and retrieve the weight, which allows me to pull the brush through from below.

In a normal year's cleaning, that would be enough. Pull the brush down as far as the stovepipe connection, pull it back up again, repeat several times, clean the bottom of the chimney out again, and put the tools away for another year. This year, though, having skipped a cleaning, we couldn't get the brush any lower than about five feet above the stovepipe connection before it got completely stuck in built-up creosote. After a lot of wrestling, we realized that we would have to clean that section by hand through the stovepipe thimble! After plenty of creative cursing, scraped arms, mess everywhere, and proctology jokes, we were finally able to proceed, scraping away two years' worth of creosote and making the chimney ready for another heating season.

The best thing about this year's cleaning was having the boys help me. With one relaying instructions from me by walkie-talkie, and the other up on the chimney doing most of the pulling, it went faster than usual, even with the excessive creosote, and was far more fun and less frustrating. Now, when I talk about running the stove too cool, and how it can add to our build-up in the chimney, they will have a first-hand understanding. And wherever they go in life, they'll know how to clean their own chimney!

Saturday, August 25, 2012

Hemlock Balcony and Stair Railing

The balcony before the railing.
I've alluded to this already, and there are already one or two photos of the railing that I've been working on, but I want to review the whole project in one post, to show how it all fits together, and how you can do it. I received a great compliment a few days ago, when Kissy from Dragonfly Acres, who will be building a cordwood masonry house with Ben not far away over the next couple of years, took one look at it and said, "I'm totally stealing that idea!" It was really easy to put together, and used a lot of material from the land, instead of from the store, so read on...

Hemlock logs for stair support.
What I had for years was a balcony with a temporary railing screwed together from three-inch strapping, draped with fabric to cover the scrap-lumber storage that had taken the space over, and stairs quickly knocked together from scrap two-by-sixes. (The photo above left shows what I had after taking down the "temporary" railing.) Then last year I scrapped the temporary stairs and made extremely heavy-duty stairs from two large hemlock logs (my best free-hand chainsaw work to date) with oak risers and treads.

This spring I cut and peeled about a hundred small hemlock trees, leaving the +/_ four-foot lengths to dry for a few weeks. A good thing about hemlock is that in spring and summer you can easily peel it with no tools at all, and the sap is not sticky, unlike pine or spruce. It's also remarkably hard and strong for a softwood, so is especially suited to uses like joists, stringers, studs, sub-floor planks, and stair-railings. It is hard enough that you'll want to drill a pilot-hole for everything, to avoid snapping screws, bending nails, or splitting the wood. (Side note, and maybe a future post: hemlock bark is really nice for basket-weaving. You can easily cut strips of a needed size out of your peelings, and they remain flexible for an hour or two without soaking. They dry hard, like wood. With age it becomes brittle, but is very pretty for decorative uses.

Scooby likes the new work.
Milled overlap, and bungees.
 After VERY carefully trimming the knots on a tablesaw, then hand-sanding with a sanding sponge, I organized the pieces by diameter, and cut a flat segment into the bottom eight inches or so of all of the ones I wanted for the balcony railing. The pieces for the stairs didn't need a flat surface. Then, going with about a five-inch on-center spacing, I attached them to the balcony with two screws apiece. They started out sticking up at all angles, but roughly vertical. That didn't worry me; I had a plan!

This ragged look cleans up nice...
Here I have to confess that I bought the boards for the top of the railing. If I hadn't been in such an all-fired hurry to make things ready for Honey and the kids to  be able to use the space, I would have taken a little more time, used reclaimed wood, and just spent more time sanding and fitting it. So yes, I bought a few running feet of pine board in three and four inch sizes, milled an overlap for them, as seen in the photo on the left here, and got to work with screws and glue, using bungies to hold the boards in place while I worked. One of these days, I may do a post about the crazy things I've done in the name of not asking for help...
  
I really like the natural look of these uprights, much more than store-bought straight pieces, especially in a rustic space like Ironwood Hollow. It looks more like live stuff, and so much more individual and interesting! Once the balcony was finished, I spent a few days in a staring contest with the stairs. It's hard to describe all the variables that I was debating with myself, but in short, I wanted to turn the corner neatly, go down the stairs, have it be sturdy to lean against, and just look neat and clean. What I ended up doing was having two uprights per tread, with every second one being screwed to the riser on the tread above it. I used a one-inch forstner bit for really neat holes for each of these, and shaved each upright carefully to fit just right. Okay, here's my confession (don't tell the kids); I was a little concerned about the strength of all of this, and leaning hard against it didn't completely reassure me. After all, I now have teenagers. Athletic ones. Show-offs. Who have friends. They do things like hand-stand push-ups ans back-flip dives, so a guy like me can barely keep up... You can see where I'm going, right? One of these days, I come home to find my quaint hemlock railing in pieces, and one of the kids' friends being picked up by upset parents after they've crashed into the lower level followed by a bunch of toothpicks that used to be an artistic railing...
The final product, no sliding allowed!
So, don't tell the kids, but I stood on the balcony railing, and actually jumped up and down. And I slid down the railing. Several times, because it was so much fun. Er, I mean, just to make sure it's safe for the kids. But still, there'll be a house rule, can't have them thinking it's a jungle gym around here, right? Oh, and then I hand-sanded some more, not going to elaborate on that.

As a last note, you may note the remaining railing mounted to the cordwood wall. That's just a cedar board with spacers for your right hand going up, and next year, when I can cut and peel more hemlocks, I'll replace that with a railing to match the one in the foreground. Since I use our property as a firewood lot, every small softwood that I can use productively opens up the lot for more usable hardwood, so I'm always looking for new uses for hemlock, cedar, spruce, and pine, which are my local non-firewood species. The added benefit is that this railing would have cost hundreds and hundred of dollars if I had bought all of the materials. Built this way, I have the benefit of clearing some softwoods from my woodlot, and managed to build a unique part of our home at a total expense of about eighty dollars.
The full railing with a view of the main floor.

Wednesday, August 8, 2012

Ramblings and a Tip

Carrying wood without wrestling with it!
As you know, I have been using peeled and hand-sanded hemlock for the uprights of the balcony railing. The stair railing is up next, using similar methods, but in the interest of giving myself time to figure out how to do that well, I confess that I am finding other things to do with my renovating time. I turned a bookshelf into a shelved door for the pantry. I walled over an opening in the main bedroom (more on that later). I did some awesome locavore cooking with a jar of barbecue sauce made by the incomparable Craig Hickman at Annabessacook Farm (probably more on that later). I wrote another song, spent lots of time polishing up my enunciation to get ready for my big audio recording effort (definitely more on that later).

The last thing I could thing of to do is to trim out the upstairs bedroom door, on the outside where it shows to the main living space. I wanted to do something that would match the balcony work,  so I went out and cut some more hemlock, peeled it, and took it up to the family workshop.

Okay, here's a bit of a reveal. I have a utility room that has all my motorcycle gear, the cats' stuff, and all the assorted hand-tools necessary for minor work: a hand-saw, a cordless set of tools, hammers, pliers, chainsaw, a bit of electrical and plumbing gear, and so on. What I do not have is a workshop. I have sawhorses in the yard. When I need to use a tablesaw, a drill press, dado blades, or anything of that nature, I take whatever I'm working on and trudge up to the neighbor's house, where there is a workshop that I can use.

The family workshop
Hah! Okay, got you feeling sorry for me, right? Here's the workshop:

Trudging a couple of hundred yards next door to my father's home (for sure, more on him later!) to use his beautiful stone workshop, is a pure pleasure. It's outside of the home I grew up in, a slipform stone structure that could teach Ozymandias a thing or two. One of Dad's numerous remarkable achievements, it is very satisfying to work in.The hike adds time to my work, particularly when I'm fine-tuning one piece of wood at a time, but on the other hand it gets me out in the air, or else forces me to do things with simpler tools more often. It's amazing what can be done with a hand-saw and a hammer if you don't need to rush.

Don't be this poor guy!
So anyway, I have some large pieces of hemlock peeled, dried, and ready to become door-trim. Also have sixteen pieces of smaller hemlock ready to become stair railing uprights once I figure out how to turn a corner with the railing, and how it will be supported. Got them all in a pile, and realize that I'm going to look like the tarot card, ten of wands in a minute. Falling all over a lazy-man's load of wood is an old pattern with me, but I have a brainstorm. If I take a piece of rope, loop it like a firewood carrier, I can actually carry all these pieces without fetching up on every stair tread, doorway, and tree along the way!

This is so much easier...
Problem solved, I take all of my hemlock up to the workshop, and spend some time carefully carving the knots off of it, and halving each of the larger pieces lengthwise. This gives me, in just a few minutes, a good bundle of usable sticks that only need a minute or so apiece of hand-sanding with a sanding sponge before they are ready.

I have to say a couple of things here. My photos show me working on  a bare blade, working each piece of hemlock by hand without much in the way of protection. A table-saw can do sudden and irreparable damage to your fingers, so please exercise all due caution. I have a lot of experience with this, and am so aware of the dangers involved that I have never been within a country mile of an accident. Don't be casual or complacent with power tools!

The other thing about this is that, after handling almost twenty pieces of hemlock, free-handing them around a high-speed blade, I promptly went back to Ironwood Hollow and cut myself badly with a handsaw. So here's your second warning; hand tools are dangerous too! I managed to hit my thumb hard enough with a handsaw to make cuts that bled for an hour, and made the tendon on the palm side of my thumb really really tender. This reminds me of the times when I have been meticulously careful with a chainsaw, cutting cord after cord of firewood, wearing all the right protective gear, without incident, and then, right away, flattened my thumb with the limbing axe or splitting maul. So please, people, be careful even with the manually powered tools.

Long story short, I got the trim halved, the various pieces cleaned up on the table-saw, and had enough time left in my evening to start in on the stair railing.  That will be another post or two, and I am thinking I had better talk a bit about my Dad, the genius behind the workshop, his garden that provides beautifully for so many friends and family, and the way he instilled in me values that have evolved into my love of alternative and natural building, living frugally, and taking Nature as a partner in so much of life.