Showing posts with label green. Show all posts

Friday, June 7, 2013

More on Wood and Men

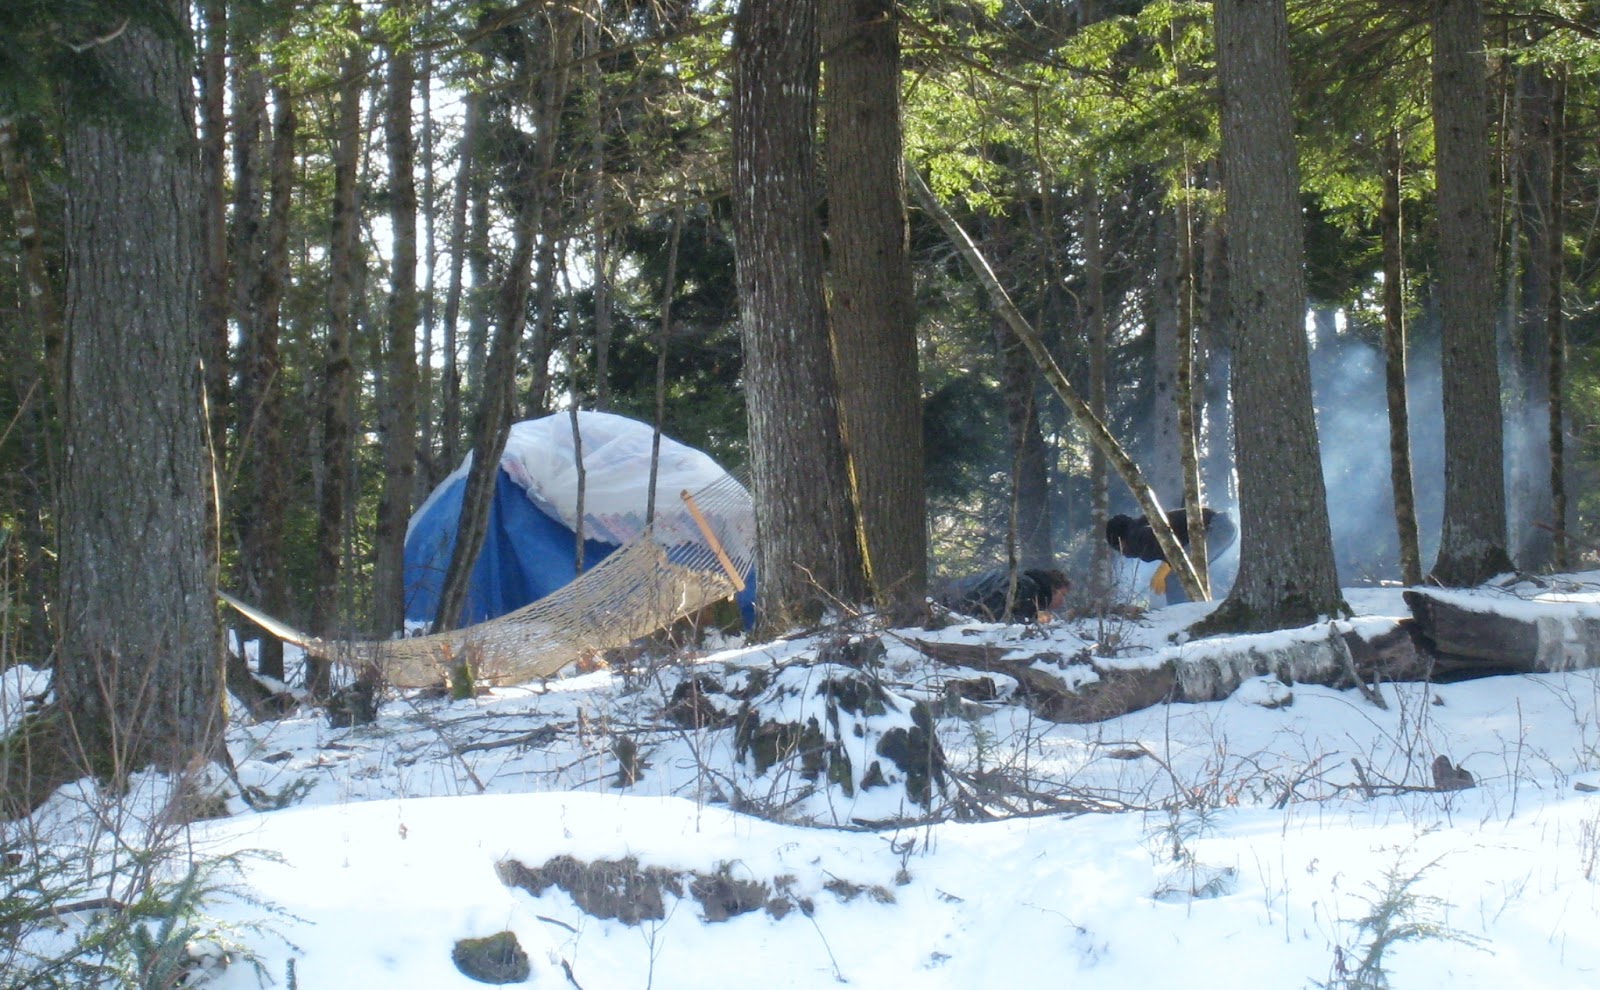
Blowing the sweat-lodge fire to life at Ironwood Hollow
In my last post I speculated about some kind of workshop that would bring men and boys together to learn/share/grow in their experience with wood. I don't think gender is a defining point in this, but my own experience is based in being first a boy and then a man, so that's coloring my thinking. After I wrote that piece, I found this photo in my camera, and there's so much in it. Please allow me to ramble.

On its face, what's happening is that the boys have decided to build a sweat-lodge. They found saplings that they could bend into shape, hunted down an assortment of tarps, old blankets, and plastic sheeting, and scoured the area for rocks to build a fire-pit. In the picture they are nursing a fire to life, to heat rocks and see if their sweat-lodge can be made sweaty and smoky. Right there, just that, is the kind of thing that I know in my heart is more good for them than a thousand hours of TV or computer time.

My own personal overlay of this picture adds so much more. That hammock in the foreground? I put that up last summer, thinking that, with my Honey and the kids moving in, I would surely need to wander out there with a frosty beer and a good book more than once in a while. You know...still my mind, commune with nature, let the kid-thing fade for a few minutes a week...

I've lain on that hammock exactly twice. For no more than ten minutes each time. The reason I bring it up is that the reason is so great; I don't ever have the impulse to go hide from this new life of having the house filled with my Honey and the kids. If I'm out there lost in a book, pretending there isn't a handful of lives closely connected to mine within a frisbee-throw, then I'm missing so much that is incredibly important. Those kids will grow up and move out into their own lives before we know it, and while they are here, I'm not going to miss it! Also, back to the picture, I find a sweetness in the way the boys thought that right next to my getaway hammock would be a great place for their sweatlodge. How cool is that?

Okay, there are even more layers to why this is such a rich photo. Just to the right, out of the frame, is where I have my shrine to the spirits of place, the magical energy that is unique to our little patch of forest. When I made it, years ago, I envisioned a life before me of settling quietly into an increasingly solitary life, mellowing under the aging trees that I know well, fondly remembering my youth of climbing those trees...I'm reaching for, and can't find to my satisfaction, the words to express how incredible it is to me that I had that vision all wrong. That saplings growing under the protection of my limbs would grow right there, reaching for the sun, that another generation of boys would scrape their knuckles wrestling chunks of stone out of the ground and dragging logs around, finding a niche of their own in the forest that provided my own growing-up space not so long ago. The spirits of this place have new ears to whisper into.

The more I realize how insidious the influence of technology in our lives has become, the more I want to listen to the trees, the soil, and my own heart, the more convinced I am that "Go out and play" may have been the wisest thing our parents ever said to us. Let's say it more often, to our kids and to ourselves.

Friday, December 7, 2012

Ice Lanterns for Winter Beauty

Here in Maine we've been making ice lanterns whether we like it or not for as long as there have been buckets. I remember punching a hole in my horse's frozen water, and sliding the hollow ice shell out of the pail, back during the Carter administration. I think Dad was the first to put a candle inside the glittering shell of winter ice, at least in our little family enclave.
Ice lantern with bittersweet, cedar, and rose hips.

Since those days I have set many a frozen shell of water, formed inside a five-gallon honey-bucket, up on a snow-drift, lit a pillar candle inside it, and let it burn for nights on end. Why did I never think to freeze pretty greenery into it, though? Recently I saw an example of this, and it was such an obvious and lovely improvement that I just had to laugh at myself. And then go and try it!

Here's how I used to do it: fill a five-gallon plastic bucket with cold water, and leave it outside for a full night of single-digit weather. Bring it inside, pour warm water over the bucket, slide out the frozen shape. The bottom will be much thinner. Punch a hole in it, pour out the still-liquid center, place it outside upside-down. Light a candle in it, and voila! A basic ice lantern! In cold weather it will last for a long time, and be beautiful.

Now, some improvements to that basic lantern. I went out and cut some cedar sprigs, some bittersweet, and some rose-hips. You could use anything that is pretty, from pine-cones to dried flowers. Then I cut the top off of a 2-liter soda bottle, just below the sloped curve, so it made a large empty pillar. I found some rocks to fill it with. Using the same five-gallon bucket, I placed the rock-filled container in the bucket, filled the bucket around that with cold water, and some ice cubes to get it started, and arranged my pretty greenery around the soda bottle. 

The candle lights the frozen greenery from within, winter magic!
Leaving it outside overnight on a below-twenty-degrees night just barely did it. The ice was thin. You might need to take two nights like that, or wait until a single-digit night is forecast. I suggest placing the bucket on lawn furniture or wooden slats, anything to get it off the ground. Surprisingly, the ground will insulate the water from below. The next morning, all you need to do is free it from the bucket by running tapwater over the outside and sliding your lantern carefully out into the sink, letting the water in the middle escape down the drain. The following evening, place a tea-light, votive, or pillar candle inside, and you've got wintry gorgeousness! However you celebrate the coldest, darkest time of the year, an ice lantern sporting your local winter color can add a special magic...

Wednesday, August 8, 2012

Ramblings and a Tip

Carrying wood without wrestling with it!
As you know, I have been using peeled and hand-sanded hemlock for the uprights of the balcony railing. The stair railing is up next, using similar methods, but in the interest of giving myself time to figure out how to do that well, I confess that I am finding other things to do with my renovating time. I turned a bookshelf into a shelved door for the pantry. I walled over an opening in the main bedroom (more on that later). I did some awesome locavore cooking with a jar of barbecue sauce made by the incomparable Craig Hickman at Annabessacook Farm (probably more on that later). I wrote another song, spent lots of time polishing up my enunciation to get ready for my big audio recording effort (definitely more on that later).

The last thing I could thing of to do is to trim out the upstairs bedroom door, on the outside where it shows to the main living space. I wanted to do something that would match the balcony work,  so I went out and cut some more hemlock, peeled it, and took it up to the family workshop.

Okay, here's a bit of a reveal. I have a utility room that has all my motorcycle gear, the cats' stuff, and all the assorted hand-tools necessary for minor work: a hand-saw, a cordless set of tools, hammers, pliers, chainsaw, a bit of electrical and plumbing gear, and so on. What I do not have is a workshop. I have sawhorses in the yard. When I need to use a tablesaw, a drill press, dado blades, or anything of that nature, I take whatever I'm working on and trudge up to the neighbor's house, where there is a workshop that I can use.

The family workshop
Hah! Okay, got you feeling sorry for me, right? Here's the workshop:

Trudging a couple of hundred yards next door to my father's home (for sure, more on him later!) to use his beautiful stone workshop, is a pure pleasure. It's outside of the home I grew up in, a slipform stone structure that could teach Ozymandias a thing or two. One of Dad's numerous remarkable achievements, it is very satisfying to work in.The hike adds time to my work, particularly when I'm fine-tuning one piece of wood at a time, but on the other hand it gets me out in the air, or else forces me to do things with simpler tools more often. It's amazing what can be done with a hand-saw and a hammer if you don't need to rush.

Don't be this poor guy!
So anyway, I have some large pieces of hemlock peeled, dried, and ready to become door-trim. Also have sixteen pieces of smaller hemlock ready to become stair railing uprights once I figure out how to turn a corner with the railing, and how it will be supported. Got them all in a pile, and realize that I'm going to look like the tarot card, ten of wands in a minute. Falling all over a lazy-man's load of wood is an old pattern with me, but I have a brainstorm. If I take a piece of rope, loop it like a firewood carrier, I can actually carry all these pieces without fetching up on every stair tread, doorway, and tree along the way!

This is so much easier...
Problem solved, I take all of my hemlock up to the workshop, and spend some time carefully carving the knots off of it, and halving each of the larger pieces lengthwise. This gives me, in just a few minutes, a good bundle of usable sticks that only need a minute or so apiece of hand-sanding with a sanding sponge before they are ready.

I have to say a couple of things here. My photos show me working on  a bare blade, working each piece of hemlock by hand without much in the way of protection. A table-saw can do sudden and irreparable damage to your fingers, so please exercise all due caution. I have a lot of experience with this, and am so aware of the dangers involved that I have never been within a country mile of an accident. Don't be casual or complacent with power tools!

The other thing about this is that, after handling almost twenty pieces of hemlock, free-handing them around a high-speed blade, I promptly went back to Ironwood Hollow and cut myself badly with a handsaw. So here's your second warning; hand tools are dangerous too! I managed to hit my thumb hard enough with a handsaw to make cuts that bled for an hour, and made the tendon on the palm side of my thumb really really tender. This reminds me of the times when I have been meticulously careful with a chainsaw, cutting cord after cord of firewood, wearing all the right protective gear, without incident, and then, right away, flattened my thumb with the limbing axe or splitting maul. So please, people, be careful even with the manually powered tools.

Long story short, I got the trim halved, the various pieces cleaned up on the table-saw, and had enough time left in my evening to start in on the stair railing.  That will be another post or two, and I am thinking I had better talk a bit about my Dad, the genius behind the workshop, his garden that provides beautifully for so many friends and family, and the way he instilled in me values that have evolved into my love of alternative and natural building, living frugally, and taking Nature as a partner in so much of life.


Saturday, August 4, 2012

Reclaiming

The price of milled wood is high, and not only in dollars. It is easy for me, deep in the woods of Maine, to forget how much of the world's once-forested land is now bare of tree-cover, but it's worth remembering. The effect of clearing a forest is enormous. The streams, once shaded, heat up and even dry up, changing or eliminating the habitat for insects, fish, and other life that depends on that water. The trees themselves, food and habitat for a complex network of life, are no longer there to support that life. 

A large wall done in all reclaimed wood...
So yes, the price is high, whether we can afford that truckload of two-by-fours and inch board or not. When I go to my local transfer station, there's a large pile of scrap wood, destined to be burned for electricity production, that accumulates all week and is then trucked away. Frugal and green-thinking people like myself are always watching that pile for useful wood, and much of it gets a second life. Today I found two two-by-sixes nailed together, covered with staples and box-nails, but fresh, solid, and straight. That's something like fifteen dollars, maybe more, that I will save by taking them home, extracting the nails, and storing them for future use. I have a doorway that I want to close off, and they will be just what I need.

For weeks I have been watching for discarded hardwood boards, taking any that are about 3/4 inch thick and at least 39 inches long. They will be slats for a couple of twin-sized bed platforms that I'm building. Oak flooring is perfect, and I keep finding some, only needing to take a few minutes to pry out the old flooring nails and cut the boards to size. 

Re-used doors, oak flooring for bed-slats...
In the same room, I started with unfinished walls, just the studs and insulation in place, three months ago. In that time I have been able to finish the walls with mismatched inch-boards of all kinds, along with cupboard doors, a couple of closet doors, and even an old store-front sign. Most of this wood came from the transfer station, and only required a few minutes per piece of nail-removal and some light hand-sanding. It's not fine and neat in the way that drywall is, but it IS classy in a rustic way, more solid, and completely free except for the nails! In fact, many of the nails used came from the reclaimed boards in the first place. I saved the planet the cost of either drywall manufacture or tree-cutting and milling, which pairs well with my satisfaction at getting more done with less. 

There's another positive aspect to this kind of re-use that is hard to put into words, but I'll try. Each board that I bring home and clean up has its own history, and I can guess at that history while I work on it, and thereafter whenever I notice that particular board on a wall in our home. I think that may be hard to imagine for people who live in pre-made homes, but picture this...

Oh, the history in those boards!
In the kitchen, one of the logs in the cordwood masonry wall above the range is a piece of my grandmother's apple tree, from a branch that fell. That tree shows in photos from the civil war era, it is so old, and touching the wood reminds me of my grandmother, a fine woman who raised my remarkable mother. That's one piece of wood that I know very well. Among these reclaimed boards are sweet mysteries; a piece that was part of a very large packing crate, holding what, I have no idea,  one that held old square nails and showed signs of decades of paint and wear, that I imagine was on someone's living room floor through generations of good life, one that looks like it was used in a lath-and-plaster wall, so was part of a very old house that is now being remodeled. One that is wide, mellowed into a lovely deep amber with age, may have been on a living room wall of someone's summer camp through many seasons of canoeing and fishing...the clues in the wood are intriguing, and give the walls so much more character than they would have if I had simply plastered together some mass-produced drywall.

A sneak peak at the girls' room in process...
In the converted library, I'm painting those boards a daring teal color. In the main bedroom I'm leaving them in their natural rustic glory. I'm going to love looking around and seeing the mill-marks, the re-used old square nails, the paint edges that hint at each board's history, the texture and color differences between the pine, the hemlock, the spruce, that oak, the inevitable dents from pulling out old nails. The best thing, though? We get to give all of those boards a whole new life; they will witness generations of life in our home, soak up the cooking smells, take the dents of life being lived, shelter us from the cold and the sun for decades to come, instead of being sent off to be rendered into a moment's power supply.

Saturday, July 28, 2012

How to Pull a Nail


Pulling nails is an important part of reclaiming used boards. You can start with a porcupine of pine and finishing nails, and with a bit of patience end up with a perfectly good ten-dollar board. Sure, it'll have nail holes and hammer-marks in it, but those just add character. When I use these boards, I give them a light once-over with a sanding sponge, so no splinters are threatening, and use them as-is, aside than that. The slight variations, the evident history of the boards, and the marks from removing nails, screws, and staples, all add charm to the finished project. 

Add a couple of screwdrivers, and you's set!
I know that a lot of people know how to clean up a board, but I bet some don't, and there are a few tips that can help. Here's how I do it. First, some tools...I like to use a pair of sawhorses to work on instead of a workbench or the floor. With nails sticking out of both sides of a board, it's easier to hold it flat on the sawhorses, and they are a good working height. Other tools are a claw-hammer, a cat's paw, a splitting wedge if boards are nailed together, a small board for a fulcrum, and for larger nails, a wrecking bar. For removing staples, flat scredrivers and an assortment of pliers are handy, and for removing screws, a screwdriver, cordless if you like, with the appropriate working tip.

Finish, twist, ring-shank, common.
Nails come in many types, but basically you have a couple of variables. There are plain shanks and twisted- or ring-shanked nails. Flooring nails are an example of ring-shanked, and there are a number of twisted nails, which are designed to stay in place without backing out. What this means to you, in removing them, is that they need to be pulled harder! Plain nails pull out much more easily.  The old-fashioned rectangular nails, called cut nails, come out very easily too, as they are tapered. Once they get started, they are loose immediately. 

The other variable is the head of the nail. Common nails are the ones with a head that is like a tiny coin shape. Those are easier to get a grip on for removing. Finishing nails are the ones with just a little dimpled bump on the top, and they are harder to get a grip on. Sometimes a large pair of pliers work better than a hammer on those. 

Let's say we have a board with three nails in it. One is partly hammered in, with the top end sticking out some. The second is hammered all the way in, and sticks out the other side. The third is hammered all the way in, but isn't long enough to stick out the other side.

The first one is the easiest. All you need to do is slide the claw of the hammer under the nail head, put a board under the hammerhead if there is room, and if you want to avoid denting your board, and pry out the nail. Easy-peasy!

Some nails to pull

A scrap board helps
The second one takes two steps. First, turn the board over, bend the pointed end of the nail with your hammer until it is straight, and pound on the point, driving the head back out the other side. Then turn the board back over and pry it out like the first nail. 

The third one is where the cat's paw comes in. There's no way to hammer the pointy end, and the head is flat or buried so you can't get the hammer claw under it. The cat's paw is designed for this; line it up against the nail-head, and bang it with the hammer right on the curve of the paw, driving its claw under the nail-head. Then pry until the nail comes up a little, and then you can use the hammer on it as above.
Hammer it under the head, then pull

Pound it back through
Once you have all of the nails, screws, and staples removed from the board, you have a usable piece of wood to be proud of, and some nails that you can straighten out and use again. Nails are expensive, and re-using them saves you money as well as the environment. The two basic ways to straighten a nail are to either lay it down on scrap-wood and nail out the bends, or to unbend it with one or two pairs of pliers. It's easy, and doesn't take long.
Channel-locks work as a lever

One last caution for you; if you are planning to cut the board, or rip it to a different size on a table-saw, be VERY thorough about looking for nails. Recently I missed a couple of nail ends that had been cut off with a reciprocating saw during someone's demolition work, so there were no points or nail-heads showing. When I was putting that two-by-four through a table-saw to make a pair of 3 1/2 inch boards, I hit them, making a dramatic shower of sparks, and dulling my thirty-dollar blade terribly.

Now that you know how, I hope you go out there and scrounge up some good usable boards from scrap-piles, transfer stations, collapsed barns, any number of sources, and that you take pride in giving that wood new life in your own projects!

Thursday, July 26, 2012

Cordwood Masonry

Having built my own cordwood masonry house and lived in it for over ten years so far, I have quite a bit of expertise, experience, knowledge, dare I say wisdom, about the topic. Some of it comes from quickly having learned how to do it well, and some of it is from having learned over time what I wish I had done differently. Put more simply, some of it I got right, and some of it I learned from by getting it wrong.  Finally, I have a chance to share that experience; my long-time friends Ben and Kissy over in Appleton have decided to build their own very ambitious cordwood masonry house!

The home at Ironwood Hollow
Cordwood masonry is a little-known alternative building method in which you lay up short pieces of cordwood (16-inch long cedar in my case), with a specially-designed mortar. the ends of each piece show on both sides of a wall, so the effect is something like a stone and mortar wall, both inside and out. It has a number of advantages, which I'll go into in more detail later, but the two primary ones are that it is very affordable if you have the right wood available to you, and it is environmentally very sound. Using wood from my property that I harvested myself, and mortar, sand, and sawdust produced very nearby, the impact on the environment was very little. Oh, okay, a third advantage is that it is so beautiful. Most of the house goes up without nails, spikes, screws, foam, plastic, tarpaper, siding, and so on. The walls are beautiful, and last better, if you don't treat them with anything, inside or out, and don't cover them. This means, at least for the perimeter of the house, no drywall, no paint, no shingles, no siding, no foam or fiberglass insulation.

Adding details is just so much fun!
It also allows you to express yourself in your building, to include elements for style, sentiment, or utility, from stone and brick and broken pottery to drawers, reclaimed parts from other buildings, shelves, bottles, really there is no limit. The walls can be straight or curved (from side to side, not top to bottom), and can include some variety of wood types. Something that will show over time as we get into some projects inside is that my own style is quite guy-like. Light on color, heavy on things matching and being well lined-up. I am hopeful that my Honey will bring her touch to the place, and bring some by-God color to the predominantly grey and brown space. If so, soon the improvements and changes to the house will reflect her sense of style and beauty too.

My house is unusual, even for a cordwood masonry house, since I built on a hillside, on a block foundation instead of a slab, without a framework of timber, and have some sections of cordwood as tall as eighteen feet. The floor-plan is three-sided, with two long curved walls and one straight one, and three corners. From above, it looks a bit like an ark that grounded itself into Mellow Hill, and there are four different floor levels.

An oil lamp casts a cozy light on the cordwood.
I'll be coming back to cordwood masonry as a topic from time to time, as I annoy Ben and Kissy with my experience and advice, as I enjoy watching a new project of this scope take shape, as new puzzles remind me of old solutions, any time I think I have a useful bit of advice to send out into the world of cordwood masonry building. For now, I'll just say that I love my house as though it is an extension of myself, and wish for Ben and Kissy that they may find the same satisfaction as their dream home takes shape literally in their hands.

Saturday, July 21, 2012

Nesting

I am nesting. Have been for months now, and the whole process is culminating in a way that makes my toes curl and my stomach get the best kind of butterflies. I've been building my house for the last 15 years, raised a daughter in it during much of the process, and often look around when I am alone here, unsatisfied, seeing unfinished edges everywhere. Things like ceilings not painted, doors not trimmed out, floors still only exposed plank in some places. Everything has changed now, though; I am in love. Crazy in love, in the kind of love that fills my heart to overflowing, that has me writing love-songs unabashedly on a weekly basis. The kind of love that always used to make me sad when I saw it in a movie, read it in a book, heard it in a song, because I knew I didn't have it, though I wanted it more than anything. 

So here I am, a grown man feeling like a teenager in some ways, alone in a very unconventional unfinished home, with the woman-better-than-my-dreams moving in, bringing her kids, her cats, her enthusiasm, her own hopes and dreams. Am I excited? Oh, Hell yes. Nervous? Well, of course. Prepared? Oh, boy...

Some of that reclaimed wood makes a great rustic bedroom wall!
Some of that reclaimed wood.
For months I have been making room, hoping against hope that she would say yes. Several unfinished rooms had become, over the years, floor-to-ceiling storage areas. The "utility room" is simply mounds of tools, scrap wood, totes, motorcycle gear, with just enough room for a litter box and a bowl for cat food in the middle. The "library" was, until not long ago, simply filled with boxes of books, the mismatched shelves stacked with rugs, photos, paperwork, unwanted nicknacks, camping gear, and the like. The "balcony" was blessedly hidden behind some stapled-up batik fabric and overflowed with mead-buckets in various stages of production, books, lumber, junk, empty boxes. We're not talking about clutter here, but about whole parts of my house that couldn't be navigated without a flashlight, a duster, and some climbing skills. 

I'll be coming back in detail to some of the specific projects, but for today I just want to touch on some of them briefly. The bathroom, for years mostly finished, is finally getting its corner trim, small slats of cedar customized from cedar closet-paneling. The outdoor shower, long a fond dream, came together in two days of intense soldering and drilling, and now needs only some enclosing and floor-surfacing. The balcony and stairs are getting a complete make-over, railings made of peeled hemlock saplings. Watch for that entry; for the cost of some screws and just a handful of three- and four-inch boards, I am building what would cost hundreds to build conventionally. Saving lots of money, at the same time as conserving natural resources, is great when you can do it, and I'll talk in detail about how this works for me.
The risers for the railing start out going every which way, but this is temprorary.
Almost ready to tame the wild railing risers.

The library is empty now, and I've been surfacing it with reclaimed lumber from the transfer station, my goal to finish the room with only the cost of screws, nails, and paint. One wall is surfaced completely with cupboard and other doors. A built-in bunk and a secret cabinet are further signs of nesting, wanting so much to have two girls find it beautiful and magical as their new bedroom.

What once was going to be a study for me, then morphed into a guest-room, can now be home to two teen boys. Since I made it from my boyhood dreams of "the perfect bedroom," I have some reason to hope that they will like it, secret shelves, hanging chair, curved walls, and all. Am I prepared? Not yet, but working on it is indescribably satisfying.

This journal will be about much more than my nesting, this process of making my home suitable for my Beloved, sweeping, fixing, improving, building; today that is my focus, but as my new life, OUR new life, grows, many other facets of this love-filled path will find their way to these pages, and I will try my damnedest to bring you inspiration, motivation, hope, beauty, song, art, and goodwill.