Showing posts with label chimneys. Show all posts

Saturday, December 15, 2012

Maine Firewood Values in BTU

Heat Values for Common Maine Firewood.


I grew up with a couple of woodstoves, and have gotten used to "just knowing" which wood is best for heating the house, and how much heat I'll get from a particular stove-load of firewood. I can tell how long I have before I should look at stoking the fire again, by what I've put into it, and how well it's burning. This becomes second nature after a while, honest. If you are new to wood heat, it may seem like just too many variables, too many maybes. Sometimes you go to bed with a stove full of wood and wake up to good coals, sometimes it's all gone by morning. Trust me, it will make sense after a while.

The heat generated by burning wood is measured in BTUs, or British Thermal Units. Briefly, a BTU is the amount of heat needed to raise a pound of water from 39 degrees to 40 degrees fahrenheit. Most of the world measures heat by joules, but the BTU hangs on in talk of furnaces and wood-stoves. Specifically, firewood is rated in milllions of BTUs per cord. To complicate things a little further, there's the factor of how much of the heat is expended vaporizing the water contained in the wood. Now to be frank, I ran into this in my research and thought, Huh. the heat doesn't leave the house other than up the chimney, whether it's vaporizing water in the wood or not. Why should it matter? I found lists showing the effective heating of wood after considering this factor, lists that showed the raw heat availability, and lists that showed both. Some of them seemed to conflict with my experience of the heating utility of the kinds of wood that I'm used to. The sources that most closely match my experience, using the wood I almost always burn, yield these results. In Maine, most of what your likely to burn is listed here, with the best heat-providers at the top.

To be clear, if you burn softwood, like dry pine or cedar, it will burn hot. But it will burn up and become ash very quickly, compared to the hardwoods. I include hemlock because it lasts a bit longer than that, and is a good wood to include in your firewood mix to use for morning fires, just getting the heat going quickly.


There are considerations, of course. Poplar starts to rot very quickly if it is not split right away, same as all kinds of birch. Hornbeam and oak, while great heat sources, are best added to a fire that is already hot and underway. It is much easier to start a fire with hemlock and maple. Smaller pieces burn up faster than bigger pieces. If you are new to wood heating, at least try to get the hang of this; when you are there to tend it, run a smaller fire, but hotter (more air, more flame). Tend it often, adding just a stick or two. This will be quick, hot fire that will be better for your chimney, and honestly more enjoyable to look at. When you go to bed, or when you leave for work, stuff your stove with larger pieces of wood from the top of this list, and give it less air. It will burn slowly, but long. The downside of those long burns is the creosote buildup in your chimney. You can combat this by running the fire hotter when you are at home.

 Another consideration is that while oak and ironwood are your greatest heaters, they also grow slowly, ironwood especially so. You can't use several cords of ironwood annually for very long before you run out of it, and have none left growing. A variety is good, and leaving the right blend of younger trees behind to mature is also good.

Thursday, September 20, 2012

How to Clean a Chimney

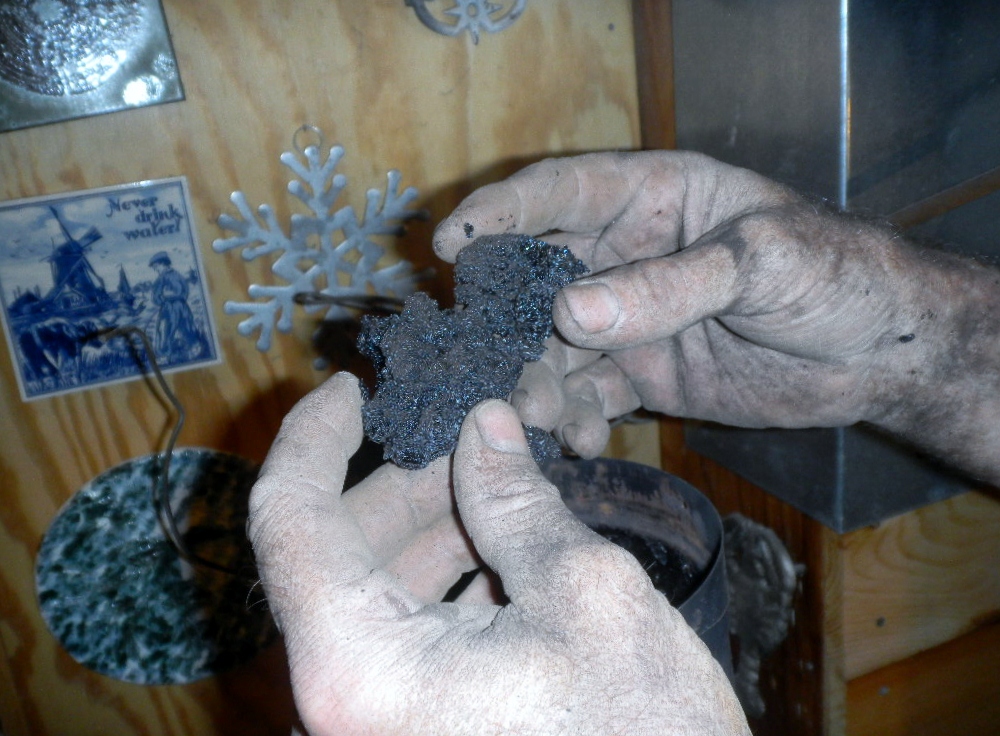
This is creosote build-up (photo by Honey)
I skipped my annual chimney-cleaning last year, partly from laziness, and partly from faint rationalization. If you have some idea that it's easy, just because it's called "sweeping," think again. Some chimneys may be easier than others, but mine requires numerous repetitions of crawling into the basement, pulling really hard on a rope and breathing ash and creosote dust, then climbing out and up to the roof to pull really hard on a rope while trying not to fall off the chimney. It has become what I think of as the hardest scheduled task of the year, since putting the firewood by is spread out over so many days.

Soren reaches deep...(photo by Honey)
 The rationalization comes from my having talked myself into thinking the chimney was clean enough. It wasn't, and I began to suspect as much this past spring, when the stove started to smoke after no provocation at all. I mistakenly believed that the galvanized-steel trick (more on that below) let me off the hook for cleaning.

It would be easy to write this post as an extended metaphor (for keeping your house in order, for not letting the debris of the past clog your present endeavors, for taking on big challenges with support rather than alone, possibilities abound), but I'm going to try and simply describe the process while celebrating this first time of having two fine young men to help. This will free you to read into it whatever metaphors or lessons you like; I only know that it was a rewarding day on several levels, the clearest of which is that we can use the wood-stove again!

(photo by Honey)
First, the thing about galvanized steel. I've heard from some old-timers that if you burn scrap galvanized steel in your fire occasionally, something about the zinc coating affects the polarity of the ions or some such thing that's beyond my schooling, and what happens is that the inevitable creosote buildup flakes off and falls down to your clean-out door at the base of the chimney. I think this works in a way similar to those chimney-cleaning powder tubes that you can buy at hardware stores. Based on the amount of granular ash in my clean-out, I believe it works up to a point. Unfortunately, it didn't work well enough for me to justify skipping a year's cleaning. The whole reason for this exercise, by the way, is that when a woodstove doesn't burn completely efficiently, and none of them do, unburned gases from the smoke condense on the inside of the flue, gradually creating a flammable, sticky deposit of creosote, like heavy tar. This is the fuel for chimney fires, and should be cleaned out regularly.
Here's the process. first, find the clean-out door at the base of your chimney, and shovel out all of the ash that has fallen to the bottom over the past year. That part's pretty easy. This year I found almost ten gallons of ash, which meant that it was stacked high up into the chimney, and I had to loosen it with a long flexible stick. Next, carefully remove the stovepipe from your woodstove to your chimney, take it outside, bang the creosote out of it, and put it back in place. If you don't put it back before moving on, you'll get a houseful of ash!
An ancient skill passes to another generation

Next, assemble your tools. I use a wire chimney brush, basically a bottle-brush made of spring steel that fits my 8-by-8 inch flue, pushed down by several threaded fiberglass rods that connect in a row. They are too springy to push the brush all the way, so I have to also pull it through from below, like flossing. To do this, I tie a weight (splitting wedge) to a sturdy rope, with the other end attached to the base of the brush. Drop the weight down the flue, start the brush down after it, and then go down cellar and retrieve the weight, which allows me to pull the brush through from below.

In a normal year's cleaning, that would be enough. Pull the brush down as far as the stovepipe connection, pull it back up again, repeat several times, clean the bottom of the chimney out again, and put the tools away for another year. This year, though, having skipped a cleaning, we couldn't get the brush any lower than about five feet above the stovepipe connection before it got completely stuck in built-up creosote. After a lot of wrestling, we realized that we would have to clean that section by hand through the stovepipe thimble! After plenty of creative cursing, scraped arms, mess everywhere, and proctology jokes, we were finally able to proceed, scraping away two years' worth of creosote and making the chimney ready for another heating season.

The best thing about this year's cleaning was having the boys help me. With one relaying instructions from me by walkie-talkie, and the other up on the chimney doing most of the pulling, it went faster than usual, even with the excessive creosote, and was far more fun and less frustrating. Now, when I talk about running the stove too cool, and how it can add to our build-up in the chimney, they will have a first-hand understanding. And wherever they go in life, they'll know how to clean their own chimney!