Showing posts with label DIY. Show all posts

Wednesday, October 2, 2013

Fork in the Road

We are lucky enough to share a decent-sized piece of the woods with my father, who lives in his geodesic dome in the middle, and my sister, who lives on the north end in an adorable cape tucked into a curve of Bump's Brook. My roots are deep here, so I may be biased, but Maine is simply spectacular, and our road is particularly nice. A couple of miles of it, where it skirts the Great Sidney Bog, is undeveloped, with no homes or even telephone poles, giving us a perfect view of each season's foliage and other natural bounty whenever we head toward town.

Technically, our driveway should have a name, according to town rules, since there are two households on it, but they've never made us do it. That means that we give directions by saying, "Go about three miles, turn left at our box number, drive across the stone bridge, and at the top of the driveway, don't go to the dome, bear left, past the barn, we're the other place..."
The Dome on Mellow Hill

Dad has it a little easier, since the dome is unmistakeable. Still, the driveway has a fork in it, and that has been nagging at me for a long time. One of the great gifts from my Dad has been his love of wordplay. More than once he has held a "proverbidioms" party, which meant that guests tried to figure out that a cedar tree wrapped in birch bark was meant to depict "Barking up the wrong tree," A recently dug hole with a playing card at the bottom was "ace in the hole," and so on. 
In that spirit, for his recent birthday, I used five feet of galvanized flashing, tin snips, and a center-punch to make him his very own landmark:
"Turn left when you come to the fork..."
 Needless to say, this was a lot of fun to wrap and present to him on his birthday, and he promptly mounted it on the woodshed. Now he can tell people to turn right at the fork, and we can tell people to turn left. 
Hmmm...I think it could be time for another Proverbidioms party!
 

Thursday, September 20, 2012

How to Clean a Chimney

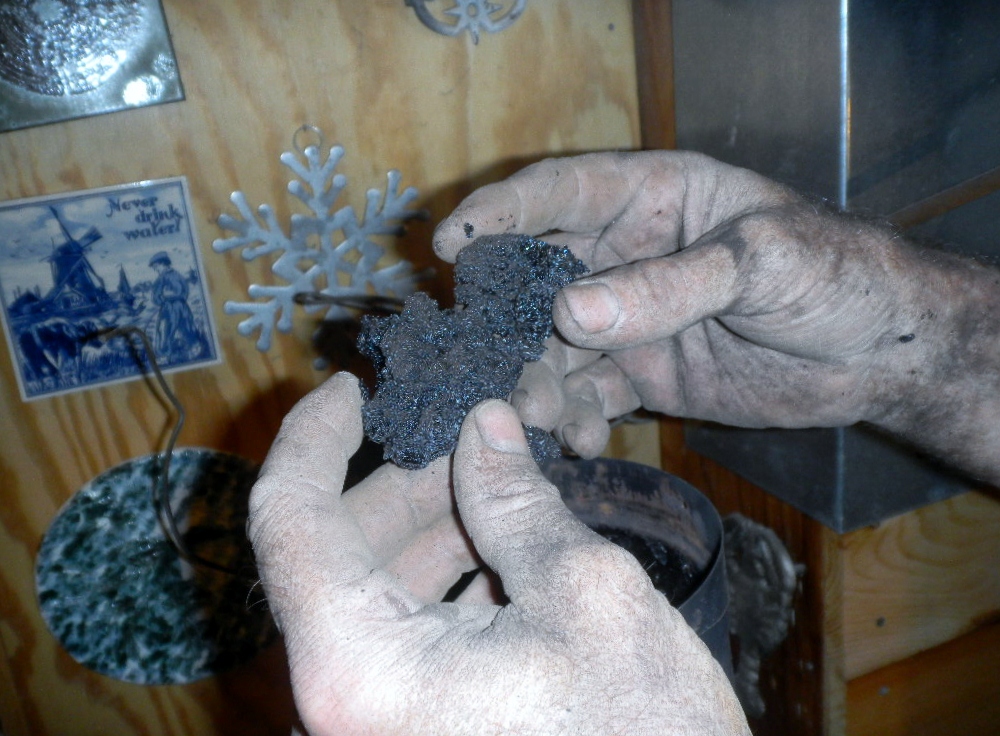
This is creosote build-up (photo by Honey)
I skipped my annual chimney-cleaning last year, partly from laziness, and partly from faint rationalization. If you have some idea that it's easy, just because it's called "sweeping," think again. Some chimneys may be easier than others, but mine requires numerous repetitions of crawling into the basement, pulling really hard on a rope and breathing ash and creosote dust, then climbing out and up to the roof to pull really hard on a rope while trying not to fall off the chimney. It has become what I think of as the hardest scheduled task of the year, since putting the firewood by is spread out over so many days.

Soren reaches deep...(photo by Honey)
 The rationalization comes from my having talked myself into thinking the chimney was clean enough. It wasn't, and I began to suspect as much this past spring, when the stove started to smoke after no provocation at all. I mistakenly believed that the galvanized-steel trick (more on that below) let me off the hook for cleaning.

It would be easy to write this post as an extended metaphor (for keeping your house in order, for not letting the debris of the past clog your present endeavors, for taking on big challenges with support rather than alone, possibilities abound), but I'm going to try and simply describe the process while celebrating this first time of having two fine young men to help. This will free you to read into it whatever metaphors or lessons you like; I only know that it was a rewarding day on several levels, the clearest of which is that we can use the wood-stove again!

(photo by Honey)
First, the thing about galvanized steel. I've heard from some old-timers that if you burn scrap galvanized steel in your fire occasionally, something about the zinc coating affects the polarity of the ions or some such thing that's beyond my schooling, and what happens is that the inevitable creosote buildup flakes off and falls down to your clean-out door at the base of the chimney. I think this works in a way similar to those chimney-cleaning powder tubes that you can buy at hardware stores. Based on the amount of granular ash in my clean-out, I believe it works up to a point. Unfortunately, it didn't work well enough for me to justify skipping a year's cleaning. The whole reason for this exercise, by the way, is that when a woodstove doesn't burn completely efficiently, and none of them do, unburned gases from the smoke condense on the inside of the flue, gradually creating a flammable, sticky deposit of creosote, like heavy tar. This is the fuel for chimney fires, and should be cleaned out regularly.
Here's the process. first, find the clean-out door at the base of your chimney, and shovel out all of the ash that has fallen to the bottom over the past year. That part's pretty easy. This year I found almost ten gallons of ash, which meant that it was stacked high up into the chimney, and I had to loosen it with a long flexible stick. Next, carefully remove the stovepipe from your woodstove to your chimney, take it outside, bang the creosote out of it, and put it back in place. If you don't put it back before moving on, you'll get a houseful of ash!
An ancient skill passes to another generation

Next, assemble your tools. I use a wire chimney brush, basically a bottle-brush made of spring steel that fits my 8-by-8 inch flue, pushed down by several threaded fiberglass rods that connect in a row. They are too springy to push the brush all the way, so I have to also pull it through from below, like flossing. To do this, I tie a weight (splitting wedge) to a sturdy rope, with the other end attached to the base of the brush. Drop the weight down the flue, start the brush down after it, and then go down cellar and retrieve the weight, which allows me to pull the brush through from below.

In a normal year's cleaning, that would be enough. Pull the brush down as far as the stovepipe connection, pull it back up again, repeat several times, clean the bottom of the chimney out again, and put the tools away for another year. This year, though, having skipped a cleaning, we couldn't get the brush any lower than about five feet above the stovepipe connection before it got completely stuck in built-up creosote. After a lot of wrestling, we realized that we would have to clean that section by hand through the stovepipe thimble! After plenty of creative cursing, scraped arms, mess everywhere, and proctology jokes, we were finally able to proceed, scraping away two years' worth of creosote and making the chimney ready for another heating season.

The best thing about this year's cleaning was having the boys help me. With one relaying instructions from me by walkie-talkie, and the other up on the chimney doing most of the pulling, it went faster than usual, even with the excessive creosote, and was far more fun and less frustrating. Now, when I talk about running the stove too cool, and how it can add to our build-up in the chimney, they will have a first-hand understanding. And wherever they go in life, they'll know how to clean their own chimney!

Tuesday, September 4, 2012

Keeping It True

In cordwood masonry building, one of the challenges is keeping your wall vertical. The load-bearing potential of the structure is dependent upon the wall being aligned as truly up-and-down as possible. A bit of variation won't be a disaster, but letting your wall wander too much will make for weak support. It could eventually buckle, or crack your windows by shifting over a leaning support system.

The metaphor is important to me. If you have a solid foundation, and build carefully and consciously upon it, then the strength that foundation will be present throughout your structure, providing safety, security, and even beauty because you have respected its gift of strength. Don't assume anything, but rather check as you go along that you and your foundation are in sync, that you're working together. Don't stray from it; honor it, and you can trust it with your home, your shelter, your life.

The most important tool for keeping your walls true in cordwood masonry is a plumb-bob, a pendulum-like brass tool on a long string, used for millennia to line up vertical work over its center of gravity. Mine is somewhat crusted with mortar, and its string is faded by time and weather, but it holds a strong magic, in my mind at least. Except for the first row or three of cordwood pieces, it was used on every single log in my cordwood masonry walls. When I look up at my highest walls, over eighteen feet from the foundation, I remember using it, over and over and over again.

First you mix up some mortar, using sand, cement mix, lime, water, and wet sawdust, along with plenty of back and arm strength with a masonry hoe. Then you carry a bucket of that and some cedar pieces up your ladder, lay a double-bead of mortar with rubber-gloved hands, and squish a piece of cedar roughly into place. Below you is a chalk-line two inches out from the base of the wall. You pull your trusty plumb-bob from your nail apron, along with a two-inch nail for a spacer, and swing it down from the head of the nail. The point of the nail is held steady against the wood, and when you have tapped the wood back and forth into the right position, the point of the bob is true above the chalk-line, making the log true at the top of the wall. Ancient science, the tradition of countless generations of carpenters and masons working through your hands, the magic of a fine metaphor, if you will pay attention to it. 

What's the most important tool for keeping your life true? Opinions may vary, but I believe that tending to your primary relationships above all else is crucial. Always checking that you are treating your loved ones as they deserve, with honesty, care, and consideration, that communication is true, you will know of potential trouble in time to correct it. You will build on that respect for your foundation.

I'm going to loan my plumb-bob, for the duration of their home-building, to Ben and Kissy of Dragonfly Acres, who have already begun harvesting cedar, and milling hemlock, for their own cordwood masonry home not far from ours. The thought of having that ancient and solid tool carry such a metaphor to another home built by people who bring thoughtfulness, love, and care to their endeavors pleases me greatly.

Tuesday, August 28, 2012

More on the girls' room

I wrote already about the girls' room, how it started as a "library" filled with boxes of books, bookshelves, assorted household spare stuff, etc. How I decided to make it into a bedroom for Honey's girls, using reclaimed lumber, with built-in bunks, hemlock door-trim, and so on.

Since then, the family has come together. Honey is moving in, bringing the kids, the boys into the Quest Room, and one girl for now into the Library. I already knew that the boys loved the Quest Room, and still have plans to make it even more awesome for them, but I had been holding my breath for the girl's response to the converted Library. When they called me, with the sound-track of thumping up and down stairs, the shouts, of, "Mom, it's so cool, there's even..." I could just feel my heart swell too big for my chest. Kids in the middle of major life-changes are so sensitive, so fragile, that I was just hoping against hope that she would just like her space enough to accept moving fairly well.  I'm all choked up right now, days later, just remembering the sound of her voice when she first saw her new room. Life is built around these moments; don't ever doubt it.


Anyway...I just wanted to add a post here with a couple of pictures of the room right before she moved in. Not shown is the second bed for whichever sister or friend might want to be here for a time, or the inevitable teen posters, or all the stuff that makes a teenage girl's room personal. If you're parents, you can imagine, and I hope the thought makes you smile...

You can see the bunk, no longer looking like a two-by-four and scrap project, made up pretty, the colors (my sister the florist tells me these are the big colors for weddings this summer), and the chalkboard panels.The pictures were taken in the middle of the night, because that's when we finally put the finishing touches to it, the painted balcony floor being the final step.

The last view is the doorway showing the main hall, with the recently-added balcony railing, and the deck-painted floor that was a last-minute marathon, just before the kids got to see where they were moving. I will never forget that phone call, when she first saw the room, loved the colors, loved the bunk, the balcony view, and made me, once again, a very, very happy man.

The natural building/frugality content here is that these walls are entirely made from reclaimed lumber, the whole room being finished for just the cost of the screws, nails, and paint. Home renovations can be affordable and still give beautiful results. The emotional content is that money doesn't build a family; love does. It takes time to do work like this, but if you turn off the TV, put down your cell-phone, stay off facebook, and choose to do something meaningful, you can have as many moments like this in your life as you can handle.

Saturday, August 25, 2012

Hemlock Balcony and Stair Railing

The balcony before the railing.
I've alluded to this already, and there are already one or two photos of the railing that I've been working on, but I want to review the whole project in one post, to show how it all fits together, and how you can do it. I received a great compliment a few days ago, when Kissy from Dragonfly Acres, who will be building a cordwood masonry house with Ben not far away over the next couple of years, took one look at it and said, "I'm totally stealing that idea!" It was really easy to put together, and used a lot of material from the land, instead of from the store, so read on...

Hemlock logs for stair support.
What I had for years was a balcony with a temporary railing screwed together from three-inch strapping, draped with fabric to cover the scrap-lumber storage that had taken the space over, and stairs quickly knocked together from scrap two-by-sixes. (The photo above left shows what I had after taking down the "temporary" railing.) Then last year I scrapped the temporary stairs and made extremely heavy-duty stairs from two large hemlock logs (my best free-hand chainsaw work to date) with oak risers and treads.

This spring I cut and peeled about a hundred small hemlock trees, leaving the +/_ four-foot lengths to dry for a few weeks. A good thing about hemlock is that in spring and summer you can easily peel it with no tools at all, and the sap is not sticky, unlike pine or spruce. It's also remarkably hard and strong for a softwood, so is especially suited to uses like joists, stringers, studs, sub-floor planks, and stair-railings. It is hard enough that you'll want to drill a pilot-hole for everything, to avoid snapping screws, bending nails, or splitting the wood. (Side note, and maybe a future post: hemlock bark is really nice for basket-weaving. You can easily cut strips of a needed size out of your peelings, and they remain flexible for an hour or two without soaking. They dry hard, like wood. With age it becomes brittle, but is very pretty for decorative uses.

Scooby likes the new work.
Milled overlap, and bungees.
 After VERY carefully trimming the knots on a tablesaw, then hand-sanding with a sanding sponge, I organized the pieces by diameter, and cut a flat segment into the bottom eight inches or so of all of the ones I wanted for the balcony railing. The pieces for the stairs didn't need a flat surface. Then, going with about a five-inch on-center spacing, I attached them to the balcony with two screws apiece. They started out sticking up at all angles, but roughly vertical. That didn't worry me; I had a plan!

This ragged look cleans up nice...
Here I have to confess that I bought the boards for the top of the railing. If I hadn't been in such an all-fired hurry to make things ready for Honey and the kids to  be able to use the space, I would have taken a little more time, used reclaimed wood, and just spent more time sanding and fitting it. So yes, I bought a few running feet of pine board in three and four inch sizes, milled an overlap for them, as seen in the photo on the left here, and got to work with screws and glue, using bungies to hold the boards in place while I worked. One of these days, I may do a post about the crazy things I've done in the name of not asking for help...
  
I really like the natural look of these uprights, much more than store-bought straight pieces, especially in a rustic space like Ironwood Hollow. It looks more like live stuff, and so much more individual and interesting! Once the balcony was finished, I spent a few days in a staring contest with the stairs. It's hard to describe all the variables that I was debating with myself, but in short, I wanted to turn the corner neatly, go down the stairs, have it be sturdy to lean against, and just look neat and clean. What I ended up doing was having two uprights per tread, with every second one being screwed to the riser on the tread above it. I used a one-inch forstner bit for really neat holes for each of these, and shaved each upright carefully to fit just right. Okay, here's my confession (don't tell the kids); I was a little concerned about the strength of all of this, and leaning hard against it didn't completely reassure me. After all, I now have teenagers. Athletic ones. Show-offs. Who have friends. They do things like hand-stand push-ups ans back-flip dives, so a guy like me can barely keep up... You can see where I'm going, right? One of these days, I come home to find my quaint hemlock railing in pieces, and one of the kids' friends being picked up by upset parents after they've crashed into the lower level followed by a bunch of toothpicks that used to be an artistic railing...
The final product, no sliding allowed!
So, don't tell the kids, but I stood on the balcony railing, and actually jumped up and down. And I slid down the railing. Several times, because it was so much fun. Er, I mean, just to make sure it's safe for the kids. But still, there'll be a house rule, can't have them thinking it's a jungle gym around here, right? Oh, and then I hand-sanded some more, not going to elaborate on that.

As a last note, you may note the remaining railing mounted to the cordwood wall. That's just a cedar board with spacers for your right hand going up, and next year, when I can cut and peel more hemlocks, I'll replace that with a railing to match the one in the foreground. Since I use our property as a firewood lot, every small softwood that I can use productively opens up the lot for more usable hardwood, so I'm always looking for new uses for hemlock, cedar, spruce, and pine, which are my local non-firewood species. The added benefit is that this railing would have cost hundreds and hundred of dollars if I had bought all of the materials. Built this way, I have the benefit of clearing some softwoods from my woodlot, and managed to build a unique part of our home at a total expense of about eighty dollars.
The full railing with a view of the main floor.

Friday, August 24, 2012

Sneak Preview of Bookshelf Door

The last thing I need to do in order to fully finish the Quest Room, once a guest room, now home to two teenage boys, is to put a door on it. I have always wanted a hidden door, disguised as a bookshelf, and it turns out that the boys like that idea as much as I do! I haven't begun yet, other than to start looking for the right wood at the transfer station, and planning in my head how it will work. 

Along with the door, I need to finish the wall that it will slide over, and that will be done using the reclaimed lumber. We had an impromptu nail-pulling lesson yesterday, and with the boys' help, cleaned enough wood for that whole job! After that is done, I think how I will do it is to use a barn-door rail-type of hanger, with a nice bookshelf built onto a sturdy back. The bottom edge will stay in place when it's moved if I install a couple of small wheels (hidden) that stay in a shallow floor-groove. 

The Quest Room
I'll be documenting that job's progress, as well as some other interior work, over the coming weeks. I just wanted to share the plan, and document a "before" photo of the room. Filled with boy-stuff now, it may not be approachable with a camera for some time (kidding, guys), and the door-project photos might just show the outside. I think I can do this whole project with recycled wood, and will be very conservative in my hardware purchases, so stay tuned.