Tuesday, August 28, 2012

More on the girls' room

I wrote already about the girls' room, how it started as a "library" filled with boxes of books, bookshelves, assorted household spare stuff, etc. How I decided to make it into a bedroom for Honey's girls, using reclaimed lumber, with built-in bunks, hemlock door-trim, and so on.

Since then, the family has come together. Honey is moving in, bringing the kids, the boys into the Quest Room, and one girl for now into the Library. I already knew that the boys loved the Quest Room, and still have plans to make it even more awesome for them, but I had been holding my breath for the girl's response to the converted Library. When they called me, with the sound-track of thumping up and down stairs, the shouts, of, "Mom, it's so cool, there's even..." I could just feel my heart swell too big for my chest. Kids in the middle of major life-changes are so sensitive, so fragile, that I was just hoping against hope that she would just like her space enough to accept moving fairly well.  I'm all choked up right now, days later, just remembering the sound of her voice when she first saw her new room. Life is built around these moments; don't ever doubt it.


Anyway...I just wanted to add a post here with a couple of pictures of the room right before she moved in. Not shown is the second bed for whichever sister or friend might want to be here for a time, or the inevitable teen posters, or all the stuff that makes a teenage girl's room personal. If you're parents, you can imagine, and I hope the thought makes you smile...

You can see the bunk, no longer looking like a two-by-four and scrap project, made up pretty, the colors (my sister the florist tells me these are the big colors for weddings this summer), and the chalkboard panels.The pictures were taken in the middle of the night, because that's when we finally put the finishing touches to it, the painted balcony floor being the final step.

The last view is the doorway showing the main hall, with the recently-added balcony railing, and the deck-painted floor that was a last-minute marathon, just before the kids got to see where they were moving. I will never forget that phone call, when she first saw the room, loved the colors, loved the bunk, the balcony view, and made me, once again, a very, very happy man.

The natural building/frugality content here is that these walls are entirely made from reclaimed lumber, the whole room being finished for just the cost of the screws, nails, and paint. Home renovations can be affordable and still give beautiful results. The emotional content is that money doesn't build a family; love does. It takes time to do work like this, but if you turn off the TV, put down your cell-phone, stay off facebook, and choose to do something meaningful, you can have as many moments like this in your life as you can handle.

Saturday, August 25, 2012

On Uncertainty

I first thought of home-building as a metaphor many years ago, when my Dad, talking about how there seems to be more to do in his home all the time, things left unfinished, early work needing to be rebuilt before planned further work is even started, said there is proverb about that.

"Confucius say, 'Man finish house, man die.' I don't know if he really did say that, but he might have..."*

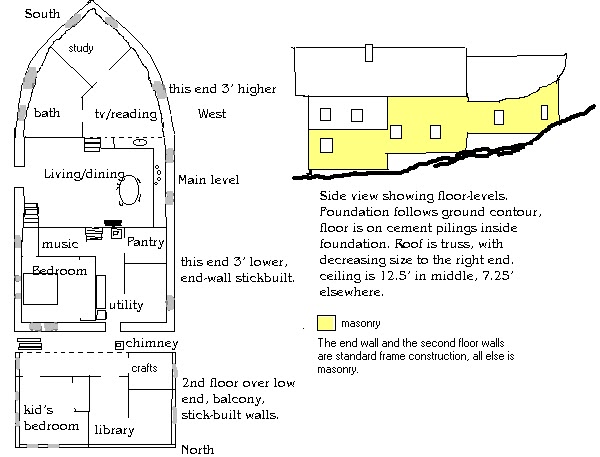
Floor plan from years ago...updates needed!
Musing about that has taken me very far into what I know about my place in the world, as it relates to my home. The structure is an extension of me, all parts built for a reason, to shelter, warm, hold up, express, comfort. If it is ever fully completed, I can only imagine the great sigh of satisfaction that will whoosh out of me, but...then what? I hope that there will always be more to do, new needs to meet, adjustments to make so as to keep up with changes, in the house, in my life, in the needs of my family.

When I was building the cordwood walls, more than a decade ago, I would take my lunch and a beer, sit on the highest point of the foundation, and imagine the fully formed home that was taking shape so slowly in front of me. From that vantage, the curved walls of the house reach out and downhill, like your arms when you are reaching for a hug. I came to think of those walls as my arms, aware that they would shelter, welcome, and comfort the people that I bring into my life, family and friends. That visualization is very powerful for me, especially now, as I ready myself and the house to welcome my Honey and the kids, and occasionally all of the new people in her extended family, parents and siblings. My grown daughter is on her own path, and those arms/walls have been empty except for my own presence for enough time that I know I am ready, the house is ready, to fill with laughter, footsteps, rattling dishes, cooking smells, brother-sister arguments, frisbees...okay, the frisbees will be outside, first rule.

Furthering the metaphor, my style of working on the house is a reflection of life, at least to my mind. I'm looking at the stairs in this picture, and seeing so much as I contemplate the logistics of getting that railing to turn a corner and go down to the first floor, sturdy and attractive.

Without going into too much detail, I'm working out how to fasten, support, and shape an armload of wood so that it has rigidity carried up from those heavy hemlock logs on each side of the treads. It's complicated, and involves trusting that a little support and strength from each piece will combine into a sturdy whole, and that little flaws here and there will become, when all is said and done, not problems, but character. I'll trust my experience, trust the materials, trying to foresee potential errors, not borrowing trouble, but looking for the way to proceed that makes the best use of the situation. When it's done, the girls will have support to hang onto as they climb to their rooms, unaware of the work and care that went into it, but with a sense of security that will serve them well. The philosophizing that is going into this may escape them as well...

Where does the work on the stair end, and the metaphor for good work in my life begin? I have made plenty of mistakes, done things poorly that I can't undo. I can only try to make the most of the result, and try to do better going forward. I have also done things well by blind luck, like having an extra room or two planned in, long before I knew that I would have this incredible woman with her beautiful family joining me. The "study" in the floor-plan above, is now going to be "the boys' room," and the "library" will be "the girls' room." Metaphor or simple reality, I only know that it is all meaningful to me, and that I will bring my best to it with as much awareness and heart as I have in me.

*On random coolness (serendipity?), I did a search for the phrase, and found it quoted by Bryce Black, who seems at first glance like somebody I have a lot in common with, and really interesting! I guess my Dad didn't make that one up after all...

Hemlock Balcony and Stair Railing

The balcony before the railing.
I've alluded to this already, and there are already one or two photos of the railing that I've been working on, but I want to review the whole project in one post, to show how it all fits together, and how you can do it. I received a great compliment a few days ago, when Kissy from Dragonfly Acres, who will be building a cordwood masonry house with Ben not far away over the next couple of years, took one look at it and said, "I'm totally stealing that idea!" It was really easy to put together, and used a lot of material from the land, instead of from the store, so read on...

Hemlock logs for stair support.
What I had for years was a balcony with a temporary railing screwed together from three-inch strapping, draped with fabric to cover the scrap-lumber storage that had taken the space over, and stairs quickly knocked together from scrap two-by-sixes. (The photo above left shows what I had after taking down the "temporary" railing.) Then last year I scrapped the temporary stairs and made extremely heavy-duty stairs from two large hemlock logs (my best free-hand chainsaw work to date) with oak risers and treads.

This spring I cut and peeled about a hundred small hemlock trees, leaving the +/_ four-foot lengths to dry for a few weeks. A good thing about hemlock is that in spring and summer you can easily peel it with no tools at all, and the sap is not sticky, unlike pine or spruce. It's also remarkably hard and strong for a softwood, so is especially suited to uses like joists, stringers, studs, sub-floor planks, and stair-railings. It is hard enough that you'll want to drill a pilot-hole for everything, to avoid snapping screws, bending nails, or splitting the wood. (Side note, and maybe a future post: hemlock bark is really nice for basket-weaving. You can easily cut strips of a needed size out of your peelings, and they remain flexible for an hour or two without soaking. They dry hard, like wood. With age it becomes brittle, but is very pretty for decorative uses.

Scooby likes the new work.
Milled overlap, and bungees.
 After VERY carefully trimming the knots on a tablesaw, then hand-sanding with a sanding sponge, I organized the pieces by diameter, and cut a flat segment into the bottom eight inches or so of all of the ones I wanted for the balcony railing. The pieces for the stairs didn't need a flat surface. Then, going with about a five-inch on-center spacing, I attached them to the balcony with two screws apiece. They started out sticking up at all angles, but roughly vertical. That didn't worry me; I had a plan!

This ragged look cleans up nice...
Here I have to confess that I bought the boards for the top of the railing. If I hadn't been in such an all-fired hurry to make things ready for Honey and the kids to  be able to use the space, I would have taken a little more time, used reclaimed wood, and just spent more time sanding and fitting it. So yes, I bought a few running feet of pine board in three and four inch sizes, milled an overlap for them, as seen in the photo on the left here, and got to work with screws and glue, using bungies to hold the boards in place while I worked. One of these days, I may do a post about the crazy things I've done in the name of not asking for help...
  
I really like the natural look of these uprights, much more than store-bought straight pieces, especially in a rustic space like Ironwood Hollow. It looks more like live stuff, and so much more individual and interesting! Once the balcony was finished, I spent a few days in a staring contest with the stairs. It's hard to describe all the variables that I was debating with myself, but in short, I wanted to turn the corner neatly, go down the stairs, have it be sturdy to lean against, and just look neat and clean. What I ended up doing was having two uprights per tread, with every second one being screwed to the riser on the tread above it. I used a one-inch forstner bit for really neat holes for each of these, and shaved each upright carefully to fit just right. Okay, here's my confession (don't tell the kids); I was a little concerned about the strength of all of this, and leaning hard against it didn't completely reassure me. After all, I now have teenagers. Athletic ones. Show-offs. Who have friends. They do things like hand-stand push-ups ans back-flip dives, so a guy like me can barely keep up... You can see where I'm going, right? One of these days, I come home to find my quaint hemlock railing in pieces, and one of the kids' friends being picked up by upset parents after they've crashed into the lower level followed by a bunch of toothpicks that used to be an artistic railing...
The final product, no sliding allowed!
So, don't tell the kids, but I stood on the balcony railing, and actually jumped up and down. And I slid down the railing. Several times, because it was so much fun. Er, I mean, just to make sure it's safe for the kids. But still, there'll be a house rule, can't have them thinking it's a jungle gym around here, right? Oh, and then I hand-sanded some more, not going to elaborate on that.

As a last note, you may note the remaining railing mounted to the cordwood wall. That's just a cedar board with spacers for your right hand going up, and next year, when I can cut and peel more hemlocks, I'll replace that with a railing to match the one in the foreground. Since I use our property as a firewood lot, every small softwood that I can use productively opens up the lot for more usable hardwood, so I'm always looking for new uses for hemlock, cedar, spruce, and pine, which are my local non-firewood species. The added benefit is that this railing would have cost hundreds and hundred of dollars if I had bought all of the materials. Built this way, I have the benefit of clearing some softwoods from my woodlot, and managed to build a unique part of our home at a total expense of about eighty dollars.
The full railing with a view of the main floor.

The Tale of the Girls' Room

I really wish that I had taken some 'before' photos. Absent those, let me paint you a picture. A few months ago, the 'library' at Ironwood Hollow was a large room with one wall finished, sort of, in plywood, the ceiling sheetrocked but otherwise unfinished, a door hung but not trimmed out, a plywood floor, studded walls with exposed fiberglass insulation, and piles and piles of boxed books and general household leftovers. I felt like a brave explorer going in there, especially after climbing over all the junk hiding behind the 'temporary' fabric balcony railing.

Then, my life changed. I began to hope that my Honey would come live with me, and gradually came to know that she would. I didn't wait for her agreement though, because I needed time to get ready if she said yes; there was suddenly much to do, and damned good reason to do it. The boys' room was easy; I had recently finished it up as a guest room, mostly, so it just needed to be cleaned out. The grownups' room needed a bit of finishing. The girls' room though, formerly known as the library, needed everything. I had to empty it, empty the balcony, build stair and balcony rails, and then actually make that unfinished dusty storage space into something that teen girls would like to live in.

Here we go...I just knew I had a picture somewhere...
Yikes. Fortunately, I started early, and treated it as a priority during whatever free time I had. The only expenditures have been a couple of gallons of paint and a couple of boxes of nails and screws. All of the wood is re-used from the transfer station or other sources of free wood. It took months of careful wood-collecting, then pulling nails, straightening boards on the table-saw, fitting mismatched pieces together, until at last we had finished walls, a sturdy bunk platform, a nifty wall of doors (only one of which opens), and were ready to plaster and paint.

The bunk and walls about a month ago...
The materials for the walls clearly had a wide variety of past uses.  There are two-by-fours from scaffolding or concrete forms, de-nailed and ripped into two boards each. There are pieces of old siding, soffits, door-frames, deck floors, camp walls, boards from behind old lath-and-plaster, tomato stakes, leftovers from building other things in recent years here, you name it. The more interesting wall started out as a stack of cupboard and closet doors. I actually liked working with those because they finished up a wall very easily, just needing a few small pieces fitted in around the leftover spaces. The final look is really great, I think!

Making hemlock trim, carefully...
I trimmed the interior of the doorway with nice leftover patterned trim, but for the outside, where it looks out over the balcony, I wanted something to match the rustic look of the main room. Taking larger hemlock trunks, 2-3 inch in diameter, and roughly halving them lengthwise on a tablesaw, and fitting them up like trim-boards, gave me the effect I was looking for. Two other doors on that level will get matching treatment when I have a bit of time for that.
As I write this, my Honey has agreed to live with me. I am simply over the moon, and we are nearing the day when the girls see their room for the first time. The suspense is keeping me going, so anxious for them to like the space...I'll post updates when the paint is dry, and I can show the finished room.

Friday, August 24, 2012

Sneak Preview of Bookshelf Door

The last thing I need to do in order to fully finish the Quest Room, once a guest room, now home to two teenage boys, is to put a door on it. I have always wanted a hidden door, disguised as a bookshelf, and it turns out that the boys like that idea as much as I do! I haven't begun yet, other than to start looking for the right wood at the transfer station, and planning in my head how it will work. 

Along with the door, I need to finish the wall that it will slide over, and that will be done using the reclaimed lumber. We had an impromptu nail-pulling lesson yesterday, and with the boys' help, cleaned enough wood for that whole job! After that is done, I think how I will do it is to use a barn-door rail-type of hanger, with a nice bookshelf built onto a sturdy back. The bottom edge will stay in place when it's moved if I install a couple of small wheels (hidden) that stay in a shallow floor-groove. 

The Quest Room
I'll be documenting that job's progress, as well as some other interior work, over the coming weeks. I just wanted to share the plan, and document a "before" photo of the room. Filled with boy-stuff now, it may not be approachable with a camera for some time (kidding, guys), and the door-project photos might just show the outside. I think I can do this whole project with recycled wood, and will be very conservative in my hardware purchases, so stay tuned.

Friday, August 17, 2012

Scrimshaw

http://www.etsy.com/shop/ironwoodhollow
Ganesha Earrings
One of my crafts, practiced more in the cooler months when a quiet desktop pursuit is more what I feel like doing, is scrimshaw. Not everyone knows the word; you know those pictures of ships and whales that look like pen-and-ink drawings, on bone or ivory? That's the stuff. When I was a boy I read about sailors decorating whalebone and ivory this way, scratching designs with a knife or a nail, then rubbing ink into the scratches. It made a great impression on me, partly because I have always identified strongly with the sailing heritage that runs deep in my family, and partly because it's such a romantic image, the lonely sailor whiling away his watch with a scrap of bone and a little knife. I imagined that they dreamed of home, but still drew what they could see at the time, ships, waves, sea-life. As a lover of words, I have also always liked the word "scrimshander," which is what you call a person who practices the craft; it just resonates with crusty old-timey character.

Conch earrings
I can't remember when I first tried it, or what I designed, but over the years I have come back to it many times, untrained in the arts but wanting to create something beautiful. The method is surprisingly easy, and these days I keep a supply of reclaimed piano ivories on hand, always looking for another poor, unwanted old piano to raid for more! Elephant ivory is the best material, and although there is a completely justified international ban on its trade, it is okay to use pre-ban ivory, such as that taken from retired pianos. I think of it as rescuing the beautiful material so it doesn't just disappear into landfills. All else that is needed are some tools for shaping the ivory, either small hand-tools, or high-speed rotaries, such as a Dremel, and some paint or ink, along with rags to wipe off excess color.

I like to design earring pairs that make a tiny image when they are side-by-side, like this potted flower. Some of these are sea-scapes, some of them form a message when they are together. The challenge of writing or drawing in miniature, using a tiny blade, then adding color a tiny dot at a time, is satisfying to me, maybe similar to the enjoyment that makers of dollhouse furniture experience. I'm needing to use reading glasses these days, but a sure grip and a steady hand are the key skills. I'll be putting together a tutorial on how to do it, either as a photo-essay or series of short videos.

My very best work is reserved for loved ones, and in fact my Honey has designs that I won't make again, because they are just too special and personal to share. All the rest, though, are available at my Etsy shop, and I often fill custom orders if it's something I think I can do well. Still at the height of warm season, I'm not spending any time with the ink and ivory, but I can feel autumn in the air some mornings, and the indoor crafts will call me back to the work-table soon enough!In the meantime, if you run across any ivory, set it aside so you can try scrimshaw out for yourself as soon as I post a tutorial!


Wednesday, August 15, 2012

Bean Hole Beans

"...there's always some level of uncertainty."
Decades ago, the hole was dug, and lined with stones painstaking pulled from the soil nearby. An enamel cookpot was committed to rough use, the first of several, as they don't last forever under this treatment. The old metal flyer-sled that my sister and I had almost outgrown was pressed into service as a bean-hole rain-cover. Since then, many times, Dad has gone out and lit a hot fire in the hole late at night, letting it burn through the night, so that the stones and surrounding soil could hold that heat.

Each time, next morning, he'd pull out the coals, replace them with a pot full of beans, water, fatback, and assorted secret ingredients. Then, against everything we learn in modern life about dirt and food, he'd shovel the soil back into the hole, burying the pot, sealing it underground with all of those hot rocks, for at least eight hours. He'd go about his day, often preparing for company, setting out the tables, cutting and jointing some meat, pulling up from the cellar something he or I had brewed, all the while enjoying the sight of smoke and steam rising from the bean-hole site like a rare Downeast fumarole.

Unearthing Bean Hole Beans
Fast-forward to last weekend, the most recent time the tradition was observed, and we have family, friends, friends of family, gathered for a belated birthday, music by yours truly, food by potluck and bean-hole. People share news, admire recent changes to the property and family home. Dad likes to make an event of the bean unearthing, and this time is no exception. 

Wielding a spade, and grinning for the fun of the occasion, for the pleasure of having such fine company, he stands beside the smoking patch of ground and clears his throat, eventually catching most of our attention. Striking a pose with the space, he announces, "I have done it in this same hole many times...but there's allllways some level of uncertainty..."

Smirking, and noting uncle Billy's chuckle, and some smart remarks ("Have you used the same tool every time?"), he begins to carefully excavate the pot, releasing clouds of smoke, while kids look on wide-eyed, not believing that FOOD is going to come from this. Soon there is a respectable pile of dirt, and the pot is revealed, safe under some aluminum foil. Carefully brushing it off and lifting it out, he carries it to the plank tables, and unveils the contents. 
Bean Hole Beans

Something very special infuses traditional bean-hole beans, and I'm not sure if it's the scent of the soil and smoke, the special care given to long-held tradition, an extra flavor imparted by the assembled family and their enjoyment of the ritual, or all of these things. All I know is that I always look forward to a plate of it, to watching how much Dad enjoys presenting it, and to the amazement of the uninitiated, when they see fine, hot, savory dinner being dug up from our bony New England soil.